
Gridinsoft Anti-Malware provides four on-demand scan types. The right choice depends on whether you need a quick check, routine protection, a complete review, or a scan of one specific folder or drive.
Choose the right scan
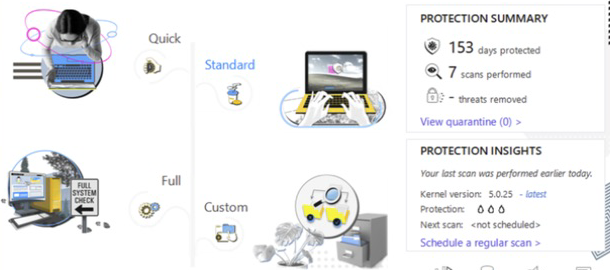
- Quick: checks active and high-risk system areas. Use it after opening a suspicious download, when the PC behaves unusually, or when you need a fast status check.
- Standard: checks the locations where common threats are most likely to persist. It is the best choice for a regular weekly scan.
- Full: examines the computer and connected storage more thoroughly. Use it after a confirmed infection, when symptoms keep returning, or when the PC has not been scanned recently.
- Custom: scans only the files, folders, disks, or USB devices you select. Use it for Downloads, a shared folder, an external drive, or another specific location.
Start an on-demand scan
- Open Gridinsoft Anti-Malware and select Scan.
- Choose Quick, Standard, Full, or Custom.
- For a Custom scan, add the required folder, disk, or removable device and review the additional scan options.
- Start the scan and keep the computer powered on until it finishes. You can pause or stop a running scan if necessary.
Before scanning, confirm that the status bar says the Threat List is up to date. If it is not current, open Update and check for updates first.
Schedule automatic scans
Open Settings → Scheduled scan. You can create a recurring schedule or a one-time scan, select the scan type, and choose the start time. The available options can also check for updates before scanning, quarantine detections automatically, restart when cleanup requires it, or shut down the PC after the scan.
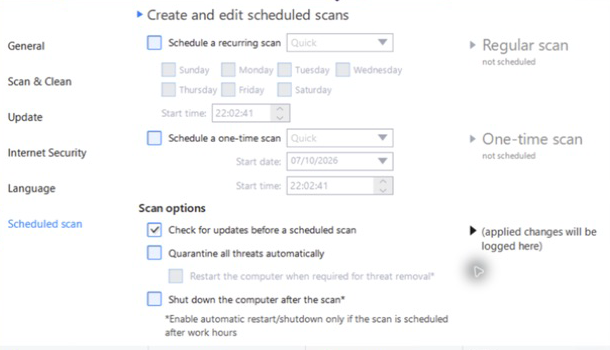
The computer must be on and awake at the scheduled time. If Windows is sleeping or powered off, run the scan manually or adjust the schedule.
Review scan results safely
When the scan finishes, review the detection name, object path, risk level, and proposed action. Do not use one action for every item without checking the list.
- Quarantine: the safest choice when you are unsure. The item cannot run, but it remains available for review or restoration.
- Delete or Remove: use for confirmed malware that you do not need to preserve.
- Ignore: use only after verifying that the item is safe. A permanent exclusion reduces future protection for that object.
See Scan Results: what you are seeing and what to do next for a detailed explanation. If a trusted file was flagged, follow the false-positive procedure before restoring or excluding it.
Scanning recommendations
- Use Quick scans for fast checks and Standard scans for routine maintenance.
- Run a Full scan after a confirmed infection or when suspicious behavior continues.
- Use Custom scan for new USB devices, downloads, and specific folders.
- Keep laptops connected to power during a long scan.
- Schedule intensive scans for a time when you do not need maximum disk performance.
If symptoms remain after a clean scan
Update the app, run a Full scan, restart Windows, and check browser extensions and network settings. If the problem continues, contact Support and include the symptoms, scan time, app version, and relevant logs.